Serial Number
When I was a little boy I read in a science magazine that after year 2000 everybody will have 3D TV. They also mentioned hover cars and family vacations on the moon. Well, they were wrong in most accounts: I drive Toyota hatchback and manned moon exploration is sadly few more decades remote history than it was back then.
But we do have 3D TVs. Well, sort of. We just need to overlook the necessary 3D glasses and pretend that it all makes a better watching experience.
Now you see how important is to have 3D function in Photo Blend.
But seriously, gimmick or not (my vote for gimmick) once you make your composition using different pieces of photos, having 3D option is just a small little step for a man.
The credit for 3D in Photo Blend goes to my father who actually loves Photo Blend but he has a bit uneasy relationship with computers. He thought the3D Rotate icon he saw will make the image somehow 3D so he just called me for the explanation. I explained to him that 'no, it doesn't make the image 3D it just rotates the object as if in 3D but it remains flat as a pancake' to which my father replied: "Why not?".
I used to mess with 3D photos and videos way before it was even remotely cool. (at that time "cool" was still spelled "kool" in a slang, yes it was that far in the ancient history)
We have every ingredient here in Photo Blend, all we need to do is somehow adjust the object in Z axis and then render it as anaglyph or other 3D format. And it makes Photo Blend one step more unique than everything else.
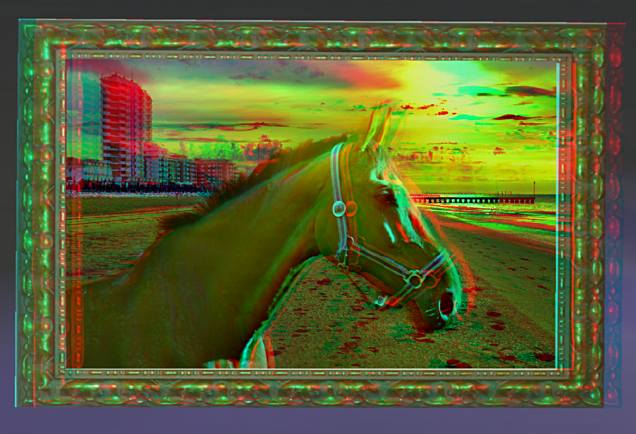
So what is 3D anaglyph?
That's the low-end, old-school of doing 3D images because all you need are those cheap red-blue glasses (they are called red-blue but in fact they are commonly red-cyan as they offer greater color information).
You can print the anaglyphs, you can put them on the web and anybody with the red-cyan glasses can see it in 3D.
Even some movies were done this way (generally a great way to give you a massive headache for the rest of the day).
If you have red-cyan glasses you can look at the image below:

How it works
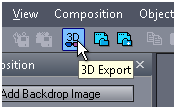
To get to the 3D mode, press the 3D Export button (or menu File - 3D Export)
In the 3D mode the image will be displayed as 3D anaglyph and you will desperately need 3D red-cyan glasses (look in your drawer or boxes in a basement, the paper version of the glasses were often included with cereals, books or older DVD's).
It is necessary to use the glasses for this function so you can judge the 3D effect in real time.

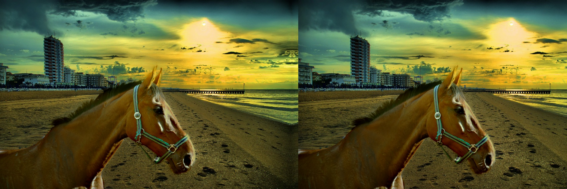
In general Tilt should be reserved for situations where vertical tilt of background need to be used so the objects would "stand" on the ground.

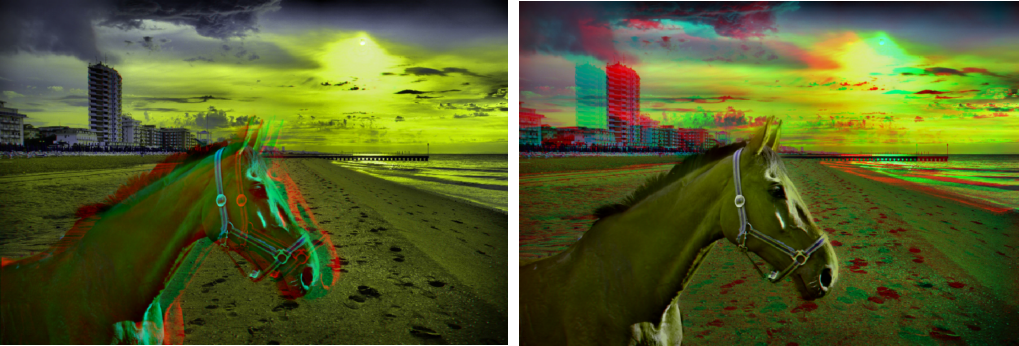
In the above image, on left we don't use any tilt and the horse will then simply appear floating in the air. The right image tilts the backdrop vertically and also horizontally to go naturally with the scene perspective. The horse had been tilted horizontally with agreement to its own perspective and moved in Z so it "stands" on the ground.
3D glasses tip
The foldable paper 3D red-cyan glasses can be bought very cheap in bulk (20 cents/unit), so in fact you can create your own new years 3D card, print it and mail it with the glasses.
It is important to note that in most ebay ads the red-cyan glasses are simply called red-blue now. However on some rare occasions you may find the red-blue to be really red and pure blue glasses (you don't want those as they don't offer color rendering) so if in doubt ask the seller.
Some red-cyan glasses are called anachrome which have bit different hues to give warmer perception. They do work, but may exhibit little more ghosting than the red-cyan.
When I was a little boy I read in a science magazine that after year 2000 everybody will have 3D TV. They also mentioned hover cars and family vacations on the moon. Well, they were wrong in most accounts: I drive Toyota hatchback and manned moon exploration is sadly few more decades remote history than it was back then.
But we do have 3D TVs. Well, sort of. We just need to overlook the necessary 3D glasses and pretend that it all makes a better watching experience.
Now you see how important is to have 3D function in Photo Blend.
But seriously, gimmick or not (my vote for gimmick) once you make your composition using different pieces of photos, having 3D option is just a small little step for a man.
The credit for 3D in Photo Blend goes to my father who actually loves Photo Blend but he has a bit uneasy relationship with computers. He thought the3D Rotate icon he saw will make the image somehow 3D so he just called me for the explanation. I explained to him that 'no, it doesn't make the image 3D it just rotates the object as if in 3D but it remains flat as a pancake' to which my father replied: "Why not?".
I used to mess with 3D photos and videos way before it was even remotely cool. (at that time "cool" was still spelled "kool" in a slang, yes it was that far in the ancient history)
We have every ingredient here in Photo Blend, all we need to do is somehow adjust the object in Z axis and then render it as anaglyph or other 3D format. And it makes Photo Blend one step more unique than everything else.
So what is 3D anaglyph?
That's the low-end, old-school of doing 3D images because all you need are those cheap red-blue glasses (they are called red-blue but in fact they are commonly red-cyan as they offer greater color information).
You can print the anaglyphs, you can put them on the web and anybody with the red-cyan glasses can see it in 3D.
Even some movies were done this way (generally a great way to give you a massive headache for the rest of the day).
If you have red-cyan glasses you can look at the image below:
To get to the 3D mode, press the 3D Export button (or menu File - 3D Export)
In the 3D mode the image will be displayed as 3D anaglyph and you will desperately need 3D red-cyan glasses (look in your drawer or boxes in a basement, the paper version of the glasses were often included with cereals, books or older DVD's).
It is necessary to use the glasses for this function so you can judge the 3D effect in real time.
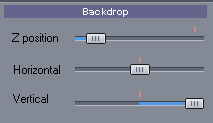
What you see here is Z depth setting for selected object and Z depth for Backdrop.
As you may see from the small red zero position line, you can move backdrop only to back (not to front) and the object can be moved back or partially forward.
The reason for this arrangement is the edge of the image. An object that crosses edge look pretty weird if it appears floating in front of an screen plane as the edge will break the illusion. Therefore you don't want to move backdrop forward at all and you should move the objects forward above the zero plane only if they are all within the frame of the image. Also any object that is moved will create ghosts but objects in the zero plane will appear as normal which could be used as an advantage (the subject of the photo will appear normal even without 3D glasses)
See the images below (use your 3D glasses) as an illustration, the left image has backdrop in the zero plane and the horse is floating above the plane (and it unnaturally breaks at the edge corner). The right image has it in reverse, the backdrop is pushed way back and the hose is in zero plane and it looks more as if we look through the window.
Of course having object floating above screen plane is a pretty neat effect, but it should be used mostly with objects that do not cross any edge (there is however a great trick with fake frame - see the end of this chapter).
Tilt
There are Tilt settings for both objects and backdrop.
This will tilt the object/backdrop horizontally and/or vertically.
The very first image uses the vertical tilt for backdrop to give a feel of perspective:
You will see that the backdrop leans from bottom toward back. Same can be for objects, like walls etc.
Of course having object floating above screen plane is a pretty neat effect, but it should be used mostly with objects that do not cross any edge (there is however a great trick with fake frame - see the end of this chapter).
Tilt
There are Tilt settings for both objects and backdrop.
This will tilt the object/backdrop horizontally and/or vertically.
The very first image uses the vertical tilt for backdrop to give a feel of perspective:
In general Tilt should be reserved for situations where vertical tilt of background need to be used so the objects would "stand" on the ground.
In the above image, on left we don't use any tilt and the horse will then simply appear floating in the air. The right image tilts the backdrop vertically and also horizontally to go naturally with the scene perspective. The horse had been tilted horizontally with agreement to its own perspective and moved in Z so it "stands" on the ground.
It is important to note that the tilt has to go with the natural perspective of the object. Doing it opposite way confuses the brain and makes the object appear twisted.
Pseudo Relief
As you experiment with the software you will notice that objects would look pancake flat in 3D as if they are cut out of paper. The Pseudo Relief is here to save the day. It will tweak the Z depth to add (completely fake) perception of solid object. It is zero in the middle and goes to minus or plus - some images may look more natural with the slider to minus, some to plus. There is no other way to describe it as this is purely optical trickery.

Anaglyph Settings
One of the problem of red-cyan anaglyph is that they would not correctly show red colors. If you let the color intact (The Basic Color setting) you may see what is called Retinal Rivalry which means any bright red object will confuse your eyes as one eye see it much brighter than the other. To solve this two other options were added, Optimized and Dubois method. They both adjust the red color bit different way with the Dubois method being most advanced.
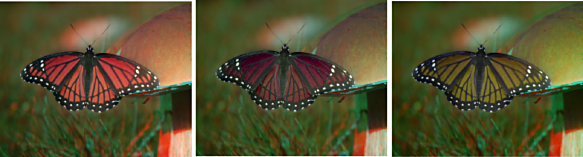
Left image is Basic color and the red butterfly exhibit Retinal Rivalry (the color of the butterfly "glows"). Middle image is optimized where the reds are make darker, right image is Dubois method that will shift the red to safe hue and compensate also other colors for the color damping effect of red-cyan glasses.
Note: this settings has no effect on S-b-S export.
Double Depth
If your final images will be presented in smaller size (for example sized down on a web page) you will probably want to use Double Depth settings that will multiply the depth perception.
All images on this page used Double Depth, otherwise in their smaller size they will look flatter.
Export
You can finally export the image as Anaglyph or the Side-by-Side format which can be converted to anything else (see below).
There are two settings Web/TV and Print. The Web/TV will quickly export the image within the limits of 1000x1000 pixels, which is great if you want to post it on the web or view it on TV. The second setting will export it as Full image (whatever are the backdrop dimensions) but it will take much longer.
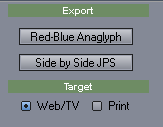
Side-by-Side 3D format
In last couple of years the 3D become popularized with active shutter glasses or using polarized filter glasses. While they provide great color quality unlike the old anaglyphs, you need a special device to view them, you can't use them on web and you can't print them either. (Ok, you can print it with the lenticular printing - which used to be popular in 50's and 60's - you may remember those 3D postcards of flickery images).
Photo Blend exports the SbS format (extension JPS) which stands for side-by-side. (and it is in fact renamed JPG file).
From the SbS you can convert to any other current or future format for viewing on 3D TV or other current or future devices without loss of quality. A great free converter for this purpose is StereoPhoto Maker by Masuji Suto & David Stykes that keeps track of all the seasonal 3D formats different makers like to use (like Sony TV's or Nintendo 3D etc..)
S-b-S export looks like this:
Tricks of the trade
Looking around the internet you may get some nice ideas about interesting looking Anaglyphs.
One of the neat trick to be able to use floating object above screen without the crossing edge problems is a fake frame. Add a neutral mask to the zero depth to mask out the edges around the whole scene and then add a practical frame object that is floating above all the objects. This will create the "objects in window" effect, but the whole window and some of the objects will be floating in front of the screen!
In the image above I created the scene where the horse floats out of the screen, then created the grayish/bluish surrounding mask - simply a whole rectangle of some solid bitmap where I hollowed the middle keeping thick edges, set it to zero depth, then created a frame object and placed it in positive depth jumping out of the screen. Pretty neat.
Pseudo Relief
As you experiment with the software you will notice that objects would look pancake flat in 3D as if they are cut out of paper. The Pseudo Relief is here to save the day. It will tweak the Z depth to add (completely fake) perception of solid object. It is zero in the middle and goes to minus or plus - some images may look more natural with the slider to minus, some to plus. There is no other way to describe it as this is purely optical trickery.
Anaglyph Settings
One of the problem of red-cyan anaglyph is that they would not correctly show red colors. If you let the color intact (The Basic Color setting) you may see what is called Retinal Rivalry which means any bright red object will confuse your eyes as one eye see it much brighter than the other. To solve this two other options were added, Optimized and Dubois method. They both adjust the red color bit different way with the Dubois method being most advanced.
Left image is Basic color and the red butterfly exhibit Retinal Rivalry (the color of the butterfly "glows"). Middle image is optimized where the reds are make darker, right image is Dubois method that will shift the red to safe hue and compensate also other colors for the color damping effect of red-cyan glasses.
Note: this settings has no effect on S-b-S export.
Double Depth
If your final images will be presented in smaller size (for example sized down on a web page) you will probably want to use Double Depth settings that will multiply the depth perception.
All images on this page used Double Depth, otherwise in their smaller size they will look flatter.
Export
You can finally export the image as Anaglyph or the Side-by-Side format which can be converted to anything else (see below).
There are two settings Web/TV and Print. The Web/TV will quickly export the image within the limits of 1000x1000 pixels, which is great if you want to post it on the web or view it on TV. The second setting will export it as Full image (whatever are the backdrop dimensions) but it will take much longer.
Side-by-Side 3D format
In last couple of years the 3D become popularized with active shutter glasses or using polarized filter glasses. While they provide great color quality unlike the old anaglyphs, you need a special device to view them, you can't use them on web and you can't print them either. (Ok, you can print it with the lenticular printing - which used to be popular in 50's and 60's - you may remember those 3D postcards of flickery images).
Photo Blend exports the SbS format (extension JPS) which stands for side-by-side. (and it is in fact renamed JPG file).
From the SbS you can convert to any other current or future format for viewing on 3D TV or other current or future devices without loss of quality. A great free converter for this purpose is StereoPhoto Maker by Masuji Suto & David Stykes that keeps track of all the seasonal 3D formats different makers like to use (like Sony TV's or Nintendo 3D etc..)
S-b-S export looks like this:
Looking around the internet you may get some nice ideas about interesting looking Anaglyphs.
One of the neat trick to be able to use floating object above screen without the crossing edge problems is a fake frame. Add a neutral mask to the zero depth to mask out the edges around the whole scene and then add a practical frame object that is floating above all the objects. This will create the "objects in window" effect, but the whole window and some of the objects will be floating in front of the screen!
In the image above I created the scene where the horse floats out of the screen, then created the grayish/bluish surrounding mask - simply a whole rectangle of some solid bitmap where I hollowed the middle keeping thick edges, set it to zero depth, then created a frame object and placed it in positive depth jumping out of the screen. Pretty neat.
3D glasses tip
The foldable paper 3D red-cyan glasses can be bought very cheap in bulk (20 cents/unit), so in fact you can create your own new years 3D card, print it and mail it with the glasses.
It is important to note that in most ebay ads the red-cyan glasses are simply called red-blue now. However on some rare occasions you may find the red-blue to be really red and pure blue glasses (you don't want those as they don't offer color rendering) so if in doubt ask the seller.
Some red-cyan glasses are called anachrome which have bit different hues to give warmer perception. They do work, but may exhibit little more ghosting than the red-cyan.
I hope one day we will see fully optically correct 3D display without the need of any glasses. And hover cars to go with them.
Note: Full A Personal Introduction


0 komentar:
Post a Comment